
In the first part of this blog series, I described how I had photographed a small batch of BBC sound effects singles to test the photographic process. Noting some issues with lighting I will return to that later. Since the photographs were taken I decided to make a start on the processing of the images.
Contents
Easy as Python
I’ve chosen to use Python scripts to automate the processing of my sound effects discs photos. I’m not going to go into why I chose Python, or what Python is here though. All I will say is that I’m running Windows 11 and I’m using the Microsoft Visual Studio application as the coding environment.
Computer Vision
The other thing I decided some time ago was to use OpenCV, which is an Open Source Computer Vision Library. You can read about it here. The purpose of OpenCV is to provide means to interpret images on a computer. For my project, I need to do two main operations on the photos and do them automatically and in bulk.
- Manipulate the image data
- Extract data from the image
By manipulating the image data, I mean editing the image in some way. This will mainly involve cropping the image so that only the label is retained and all images are the same shape – which should be a square or circle. It will also require some rotation to make the image straight, but that may be done as a consequence of the second operation. Extracting data from the image primarily means reading the text on the label.
I should note at this stage that whiles the first operation may be applicable to most record labels, the second will be specific to the BBC Sound Effects Singles. Whilst the methods of identifying the label on a record may be largely universal, for round labels on a vinyl colour which is different to the label, finding and correctly interpreting the text will vary. Even amongst the BBC SFX discs, I will probably have to handle some variations.
Crop Circles
I’ve started with the first operation – manipulation of the image data, particularly to crop. For a human, identifying the edges of a circle is relatively easy. Setting the markers on a graphics application to those edges and selecting a crop tool is also easy, although the exact placement on the precise edge of that circle is not something you could guarantee to get right every time. Using a Python script and OpenCV along with some other handy image libraries, I have tried to automatically crop the label from the surrounding image.
There are two main methods of cropping a circle from its’ background. You can find the circle around the circle or you can identify the circle as some kind of arbitrary shape outline against a background. I started with the first method but found that it did not work in a satisfying way. To do this I used the OpenCV HoughCircle function.
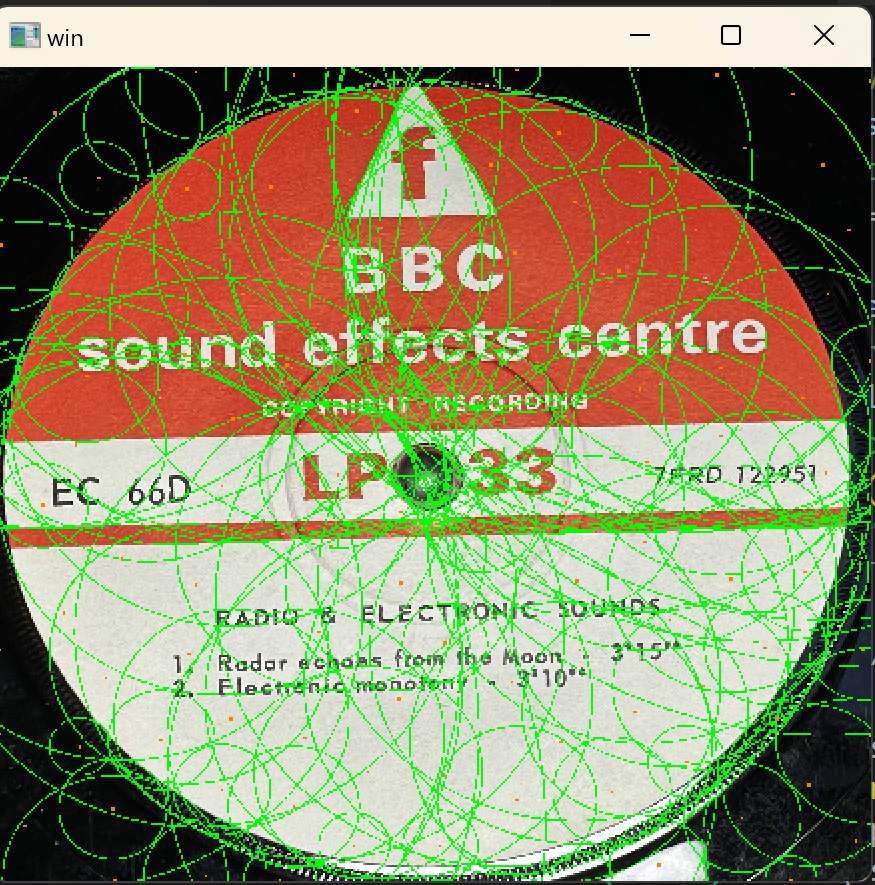
Houghing and puffing
My first attempts to outline the label in the image were complete failures. Initially, the Hough function returned far too many circles and none of them for label outline. Then it found one, but that was a circle in completely the wrong place. The lighting issues were a concern and parts of the inner groove (dead wax) were reflected as glare and so I manually removed these to see if it was improved. It was not and the same problems persisted. I solved these gross errors in two ways. The advice I found was to blur the image. This removes noise and prevents some of the incorrect circles. I also realised that if there is only a small amount of border around the label then it would not ‘see’ that as a circle inside the border. The circle was effectively part of the background. As I’d positioned and zoomed the camera to capture mostly the label I manually added a larger border (in black, to match the vinyl) around the image. Using both of these optimisations I was finally able to obtain a circle which circumscribed the label only.

With the circle defined, the coordinates of the centre of the circle, (x,y) and its radius (r) can be used to crop a square – or should I say rectangle – around the label.

Imperfect Circle
This highlighted a problem I should have expected. The photo of the label had not captured it as a perfect circle. The top half of the label was almost perfectly outlined but the bottom half was skirted, with a gap between the circle and the label. Ultimately this must come down to the photograph and the precision of the camera alignment. I had done a reasonably good job of getting the camera perpendicular to the label surface yet it was evidently not good enough. Unless the label itself is not perfectly round… although I can probably rule that out. This leaves me with a few options. Either, aim for better alignment of the camera (but how?), correct the image so that it compensates for the (slight) error in the camera angle (again, how?), or accept the error and grab the imperfect circle shape by some other means (I have an idea how). Perhaps two here could be combined.
Making the camera position perfect may not be impossible, but to what degree was it out and how can I be sure when I’ve got it to sit perfectly? Once I’ve set it up I would have to test it and then adjust if wrong. That could be tedious and I might also find it never really sits in a position which is perfect for all labels (allowing for slight differences in how well they sit flat, for example).
Correcting the image is a possibility. I just don’t know how easy that is to do. It would require the algorithm to know when the image was correct though. and that could only be done once the label edge was perfectly detected. It seems that this might be easier done once the existing label edge has been found.
Working some magic
Edge detection is easy in OpenCV with Canny, but that still needs the label to be the only shape on the image. Any other reflection will be edged as well. What I really need is to grab the label part of the image only – something like the Magic Select too on Windows Paint 3D. I have used that and it works perfectly to extract the label. Automating that might also be possible with Power Tools, but I think it might be clunky and I want to try scripting this first.

The function I need, which will pull out the label and leave anything else, is called GrabCut. The fancy term is Interactive Foreground Extraction. To be clear, this will cut out the label from my photo images in whatever shape that label is. To do this it requires a border in which the shape to be cut is found. As I already have a circle around the label I can probably use that. Only probably though, because I’m worried that on some images the circle will be smaller than the label, not larger. This will need more experimentation.
Once the circular shape has been cut I can then think about correcting it to make a perfect circle. This might be as simple as resizing the image to be a square or I might play around with tilting it.
Conclusion
I have been able to successfully automate the finding of a circle on an image of a label and use that to crop the image. This required some manual removal of glare from the vinyl which I hope to address in the photography. The circle did not completely match the label edge and I suspect I will never be able to capture perfect circles in my label photos. Therefore, I will attempt a different approach to crop the label from the background which is to use an algorithm called GrabCut. Additionally, I will need to investigate if there’s a way to correct the imperfect circle.